

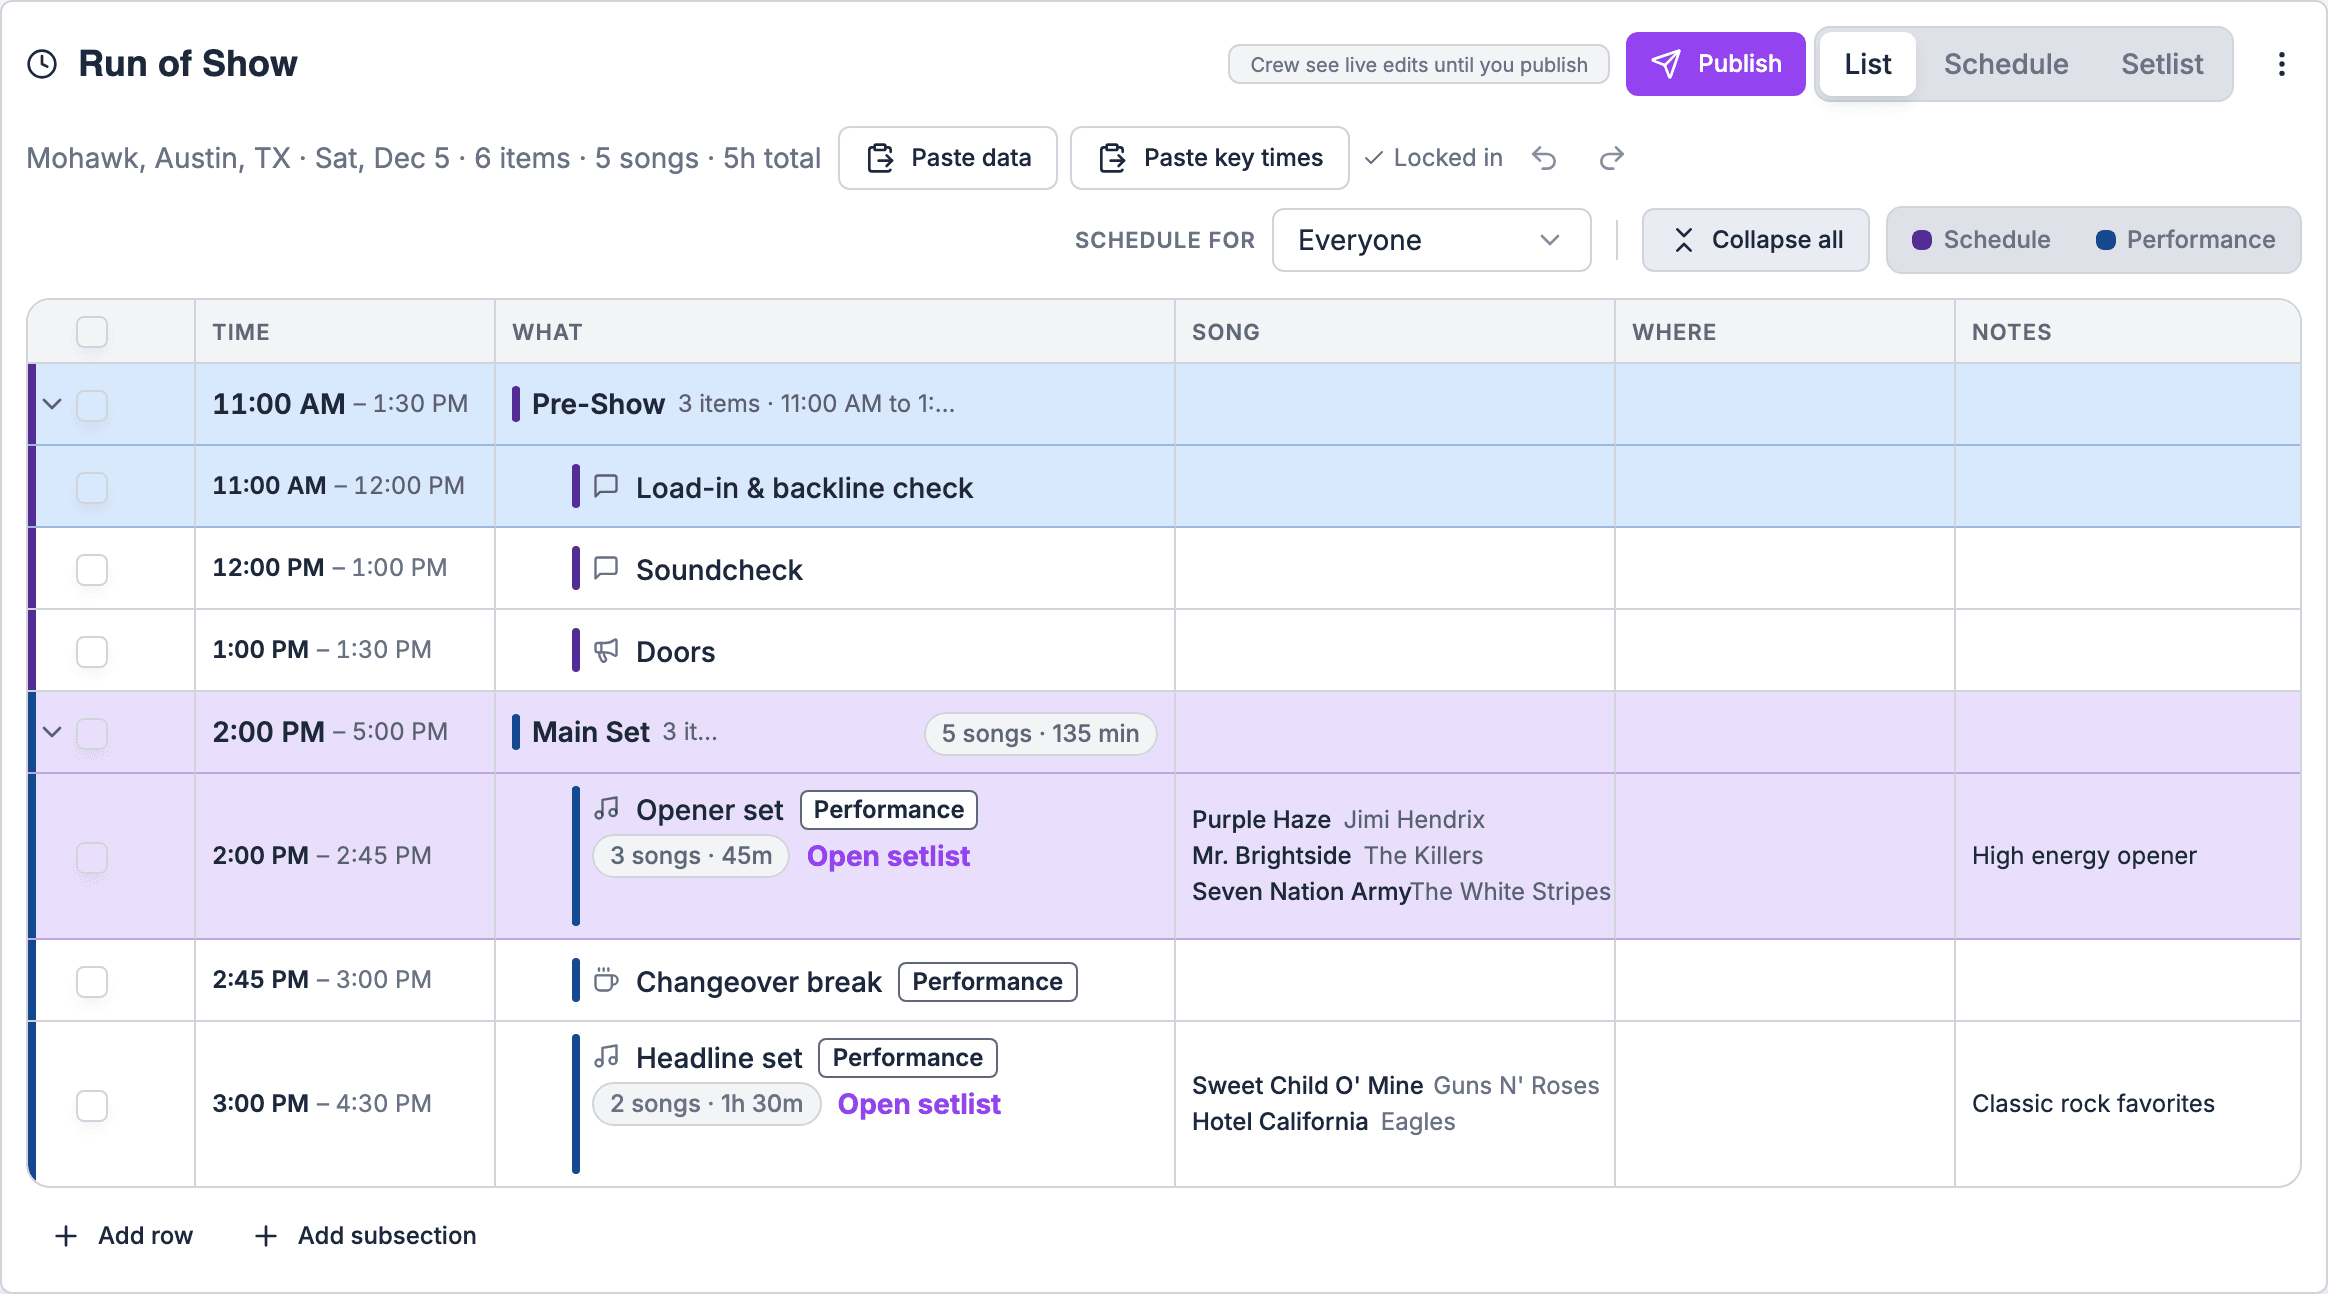
How the grid is organized
A run of show has two kinds of row:- Subsections (also called sections) are the big stretches of the night, such as Cocktail Hour, Dinner or Main Set. A subsection row is bold, shows a summary of what’s inside, and can be collapsed to a single line.
- Rows (cues or items) are the individual moments inside a subsection, such as Grand entrance, Toasts or Set 1. Every row belongs to exactly one subsection, and rows within a subsection run in order.
Adding rows and subsections
There are two buttons at the bottom left of the grid. Each does one thing:- Add row adds a new row after the last row in the run of show, with its name ready to type.
- Add subsection adds a new, empty subsection at the end, with its name ready to type.
Add subsection adds an untracked subsection straight away. To put it on a track, such as Production or Vendors, open the subsection’s Details… and pick a Track. See Tracks.
- Into a specific subsection: hover the subsection’s own row and choose Add row. The new row goes at the end of that subsection.
- Right after a specific row: hover the row and choose + in the left gutter. The new row goes directly below it, in the same subsection.
- Above or below from the menu: open the row’s ⋯ menu and choose Insert row above or Insert row below.
- Keep typing: after you name a new row, press Enter. Soundcheck saves the name and adds the next row below it, ready to type. You can build a whole subsection this way without touching the mouse.
Collapsing and expanding subsections
A long night is easier to read when you fold away the parts you’re not working on.- One subsection: choose the chevron at the far left of its row, or the summary line under its name. Choose it again to open it.
- Everything: Collapse all above the grid folds every subsection to a single row. Expand all opens them all again.
- Clicking the subsection’s name doesn’t collapse it. It opens the What panel so you can rename it.
- An empty subsection has no chevron, because there’s nothing to fold. It shows No items instead.
- Subsections stay collapsed while you edit other rows.
- Soundcheck remembers which subsections you collapsed on each gig in this browser, so they stay collapsed after a reload.
- Collapsing is just for your screen. It doesn’t change what anyone else sees.
Editing cells
Click a cell, or select it with the arrow keys and press Enter, to open its editor. Escape closes the editor without saving. Undo and Redo cover every cell change. The Notes cell works a little differently: a click only selects it. Then Delete or Backspace clears it, and typing or a double-click starts editing.Time
Clicking Time edits the row’s start time. A time picker in 5-minute steps opens. Choose OK to save, or Clear to remove the time. You can also type any minute directly. Start typing on a Time cell and the picker opens with your text in a field. The field shows how Soundcheck reads what you typed, so you can check it before you press Enter.
Press Enter on an empty field to clear the time. If you typed last, OK saves the typed time.
A row with no start time follows the row before it. You don’t have to time every row. Time the anchors, such as doors, dinner and the first set, and let the rows in between follow.
Length
The table has no Length column. To set how long a row runs, open its Details… and type a Length such as45, 1:30 or 1h 30m. The row’s end time in Time follows from its start and length.
What
The What cell opens a panel with:- Title: the row’s name. Press Enter to save it and close the panel. If the row was new and you gave it a name, Enter also adds the next row below it.
- Notes: the same text as the Notes column.
- Songs: on a song row, the songs in the set. Drag a song to reorder it, or remove it.
- Add setlist: see Adding a setlist or songs.
- Labels: tags on the row. Labels show in the What cell, but you change them only here.
- Open full details: opens the Details… side panel with everything the row can carry. See Linking cues and timing.
Adding a setlist or songs
Add setlist in the What panel opens one search list:- Setlists come first: the gig’s own setlists, then your organization’s saved setlists, each with how many sets it has.
- Gig setlist and Song library follow, with single songs.
- Pick a setlist to fill the row with that setlist’s songs. If the setlist has more than one set, the first set fills this row and each extra set becomes its own row below it. A row that wasn’t a song row (a Break, say) becomes a song row and keeps its name. Soundcheck shows a message when the setlist is added, and a warning naming any sets it skipped because they had no songs.
- Pick a song to tick it into the row, or pick it again to take it out. Ticking a song makes the row a song row and keeps its title.
Song
Click Song on a row to open the same setlist and song picker as Add setlist. The songs you pick show in the cell. A set shows its first three songs, then +N more.Where
The venue’s stages, or type a place. The location belongs to the subsection, so on a row the picker says Sets the stage for followed by the subsection’s name. Changing it on one row changes it for every row in that subsection.Who
The people picker. Search by name and tick the people on the row. Who is on a row also decides who the row is for: their checklist tasks, their Your times card and the client’s and guests’ schedules all come from it. See People and assignments.Key
Hover a row and choose Key beside its title to make it one of the gig’s key times, such as Doors, or choose Not a key time to clear it. A key time row takes its key time’s color across the whole row, such as amber for Doors, so it stands out from the rows around it. See Key times. Soundcheck rejects input the grid can’t read and shows a message instead of saving it.Pasting, filling and copying cells
The grid speaks spreadsheet, so you can move data in and out of Google Sheets or Excel.- Paste a block: copy a block of cells in Sheets or Excel, select the top-left cell in the grid, and paste. Each pasted cell is read the same way as a typed value, so times like
6:42pwork. - Fill down: select a cell and drag its fill handle down to copy the value into the cells below, the same way you would in a spreadsheet.
- Copy out: select a range and copy it. It comes out as tab-separated text that pastes cleanly into Sheets, Excel or an email.
- A paste adds the pasted people to the row and skips anyone already on it.
- The fill handle replaces the row’s own people with the ones you’re copying.
- Delete clears them.
To paste a whole schedule as text (a planner’s email or a venue’s PDF), use Paste data above the grid instead. Soundcheck reads it into rows you can review first. See Importing a schedule.
Moving rows
- Drag: hover a row and drag it by its handle in the left gutter. Drop it between two rows to move it there, including into another subsection, or drag a subsection to another day.
- Move up and Move down in the ⋯ menu move a row one place at a time, and cross subsection edges.
- Move to day, in a subsection’s menu on a multi-day gig, moves the whole subsection to another day.
- Move to… in the bulk bar moves the ticked rows into another subsection. See Changing several cues at once.
The row menu
Every row has a ⋯ menu at its right edge:Undo, redo and shortcuts
Edits save as you go. The save status sits in the run of show’s header with Undo and Redo. Every cell edit, drag, paste and bulk action is one step.Common tasks
Build a wedding night from scratch
The fastest way is to start from a template. See Templates. To build it by hand:1
Add the subsections
Choose Add subsection and type Ceremony. Choose Add subsection again for Cocktail Hour, Dinner and Dancing.
2
Add the rows
Hover Ceremony and choose Add row. Type Processional, press Enter, type Vows, press Enter, type Recessional. Do the same in the other subsections: Grand entrance and Toasts in Dinner, First dance and Set 1 in Dancing.
3
Time the anchors
Click Time on Processional and type
4p. Set Grand entrance to 6:30p and Set 1 to 8p. The rows in between follow the ones before them.4
Add the lengths
Open Details… on each row and type a Length, such as
20.5
Add the music
Click What on Set 1, choose Add setlist, and pick your saved Wedding dance setlist. A second set in that setlist becomes Set 2 below it.
6
Mark the key times and people
Hover Processional, choose Key and pick Ceremony. Click Who on each row and tick the crew who handle it.
Insert a toast in the middle of dinner
- Hover the dinner row the toast comes after.
- Choose + in the left gutter.
- Type Best man toast and press Enter to save it. Press Escape if you don’t need another row.
- Open its Details… and set its Length to
5. If it has no start time, it follows the row above it.
Move dinner 15 minutes later
To move dinner and everything after it:- Open the dinner row’s ⋯ menu.
- Choose Shift this and later, then 15 min later.
Copy a schedule from a spreadsheet
- In Google Sheets or Excel, arrange the columns in the grid’s order: start time, then what.
- Add as many empty rows in the grid as you need, with Add row and Enter.
- Copy the block in the spreadsheet, select the first Time cell in the grid, and paste.
Rename a subsection
Click the subsection’s name. The What panel opens with its Title. Type the new name and press Enter.Tips and gotchas
- Time the anchors, not every row. Rows with no start time follow the row before them, so moving an anchor moves everything after it. A fully timed run of show is harder to shift.
- Where belongs to the subsection. Changing the stage on one row changes it for the whole subsection. To put a row on another stage, move it to a subsection on that stage.
- Escape throws away the whole What panel. That includes songs you ticked while it was open. Press Enter or click outside to keep your changes.
- Picking a setlist replaces the row’s songs. It doesn’t add to them.
- Filters stop editing. While Schedule for has a person picked, or a track card is hidden, you can’t edit cells, insert rows or drag. Pick Everyone and show all tracks to edit. See Views and filters.
- Key times own the row colors. A key time row takes its key time’s color, and a subsection linked to a key time takes the color closest to its key time’s. Other subsections take a color from their position. There’s no separate color setting to keep in step.
- Edits are a draft until you publish. When publishing is on, crew don’t see your changes until you choose Publish. See Publishing and collaboration.